1st revision: December 31, 2011 (Added instructions for Windows 7. Mentioned Google Transliteration.)
This page is a simple guide to help you write (or more correctly, type) Urdu on your computer. (You might as well want to read a similar page about correctly viewing Urdu.)
Please let me know if something is incorrect or needs more explanation by leaving a comment below.
A little theory first
Don’t worry. I’ll try to be as less boring as possible.
Urdu is a language that is written right-to-left, in contrast with most other languages, such as English, that are written left-to-right. Computers need to differentiate between these two directions in order to render and input the respective text correctly. Thus, your operating system needs to have some sort of support built into itself for right-to-left languages.
After this right-to-left support, you need to tell your operating system that you intend to write in Urdu. In usual cases, whenever you press the ‘S’ key, an ‘s’ or ‘S’ appears on the screen. Fair enough. However, when your are typing some text in Urdu, your computer needs to know that when you press the ‘S’ key, you actually mean a ‘س‘ (just an example). For this purpose, what you need is a keyboard layout that will take care of all these key-meaning associations.
So let’s get our hands dirty, shall we? Just click on the name of your operating system: Microsoft Windows XP, or Microsoft Windows 7.
Microsoft Windows XP
Please note that the screenshots provided may differ from your computer’s desktop environment/theme.
Step 1: Right-to-left support
You will need the Windows XP Installation CD (or an alternative installation source) for this step.
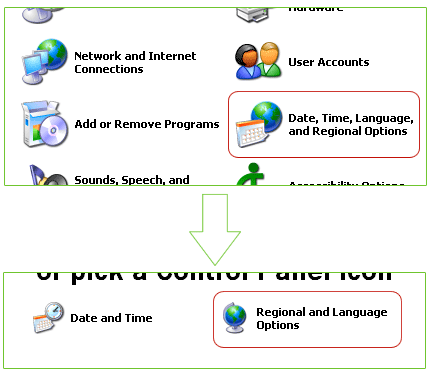
First, go to Control Panel. (Click on Start, then Settings, and then Control Panel. Or if you are not using the Classic Start Menu, then simply Start > Control Panel.)
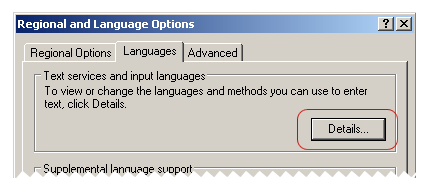
Next, enter Regional and Language Options.
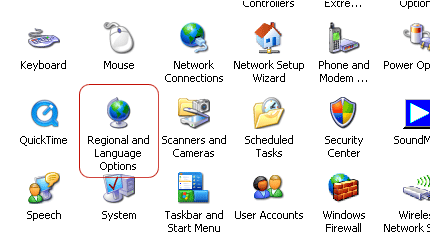
However, if your computer’s Control Panel displays the Category View, then click Date, Time, Language, and Regional Options and then Regional and Language Options.
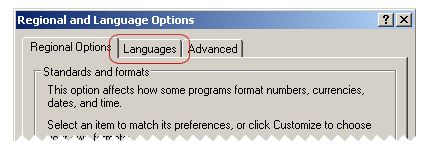
A dialog box titled “Regional and Language Options” will appear. Click on its Languages tab.
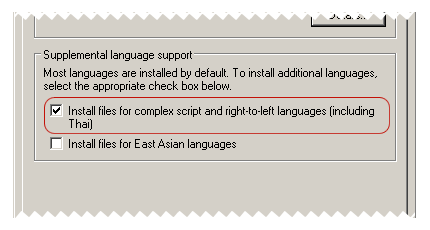
Check the option that says “Install files for complex script and right-to-left languages (including Thai)“. (If you are like me, you’ll wonder what so special is about Thai. Short explanation: Thai language requires special rules for word breaking and warping. Long explanation: No idea!)
Click OK. You’ll be prompted to insert the Windows XP installation CD, after which Windows will do some magic.
That’s it. Your computer now supports right-to-left languages. Simple, huh?
Step 2: Installing the keyboard layout
There are several Urdu keyboard layouts available; however, my personal favourite is CRULP Urdu Phonetic Keyboard Layout, released by Center for Research in Urdu Language Processing (CRULP). Even though the instructions below are for installing this phonetic keyboad layout, installing other keyboard layouts is similar and shouldn’t be difficult.
First, click on this link to go to the keyboard layout’s page on CRULP’s website, and download it. Unzip the zip file and run setup.exe. It will display a success message after installation.
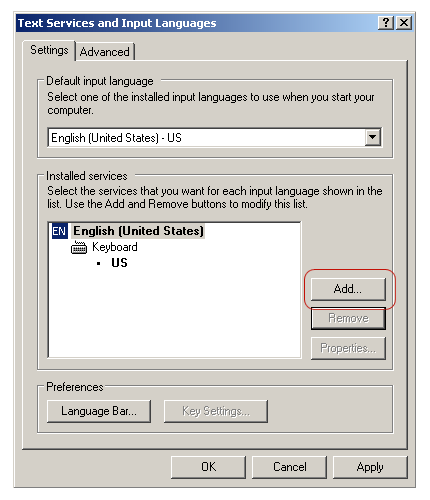
Now, visit Regional and Language Options (in the Control Panel) again. Go again in the Languages tab, and click the button that says “Details…”
A new dialog box titled “Text Services and Input Languages” will appear, showing a list of installed keyboard layouts. Since you need to add into this list the Urdu keyboard layout that you just installed, click the button that says “Add…“.
Another dialog box titled “Add Input language” will appear. Select “Urdu” for “Input language”, and “CRULP Urdu Phonetic v1.1” for “Keyboard layout/IME”.
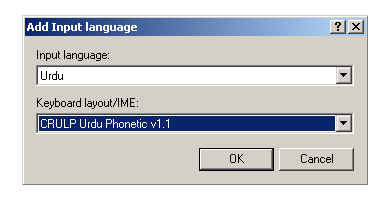
Click OK. The Urdu keyboard layout should now appear in the list.

Now that was pretty simple too, wasn’t it?
Step 3: Test
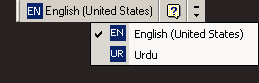
After the keyboard layout is added succesfully, you should also start seeing the Language Bar somewhere on the Desktop (or on top of the current window), as shown below. The appearance of the Language Bar may differ (and you can customize it later), but the tiny blue icon which says EN is all that matters right now. This is telling you that if you type anything right now, it will be interpreted as English by your operating system.
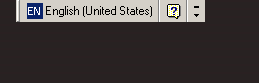
If you click the EN icon, something like below will appear. Select “UR Urdu” and the blue icon will change itself from EN to UR. As long as the Language Bar shows this UR, everything you type will be in Urdu. To switch back to English, click the UR and change it to EN. Plain and simple.
Now, for the testing part.
Open WordPad (Start > (All) Programs > Accessories > WordPad). Change the font to any Urdu font that you have installed, or if there is none, change it to Tahoma. Increase the font size as well, just for the sake of clarity (12–14 points will be fine).
Next, switch to UR in the Language Bar. Now hit these keys: P – A – K – S – T – A – N. You should see پاکستان written in the WordPad window.
(Skip the instructions for Windows 7.)
Microsoft Windows 7
Windows 7 comes with inbuilt right-to-left languages support (hurray!). So all you need to do is to install an Urdu keyboard layout. Here we go:
Step 1: Installing the keyboard layout
There are several Urdu keyboard layouts available; however, my personal favourite is CRULP Urdu Phonetic Keyboard Layout, released by Center for Research in Urdu Language Processing (CRULP). To get your hands on this keyboard layout, just click on this link to go to the keyboard layout’s page on CRULP’s website, and download it. Unzip the zip file and run setup.exe. It will display a success message after installation.
Tada! You’re done!
Step 2: Test
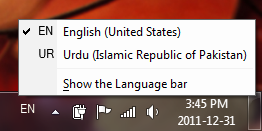
After the keyboard layout has been installed, you should see the Language Bar on the bottom right corner besides the cute little icons, as shown in the image below. By default, the Language Bar will show “EN”, which means that if you type anything right now, it will be interpreted as English by your operating system.
![]()
If you click the EN icon, something like below will appear. Select “UR Urdu (Islamic Republic of Pakistan)” and the icon will change itself from EN to UR. As long as the Language Bar shows this UR, everything you type will be in Urdu. To switch back to English, click the UR and change it to EN. Plain and simple.
For testing, open WordPad (Start > All Programs > Accessories > WordPad). Change the font to any Urdu font that you have installed, or if there is none, change it to Tahoma. Increase the font size as well, just for the sake of clarity (12–14 points will be fine).
Next, switch to UR in the Language Bar. Now hit these keys: P – A – K – S – T – A – N. You should see پاکستان written in the WordPad window.
Practice, practice, practice!
Congratulations!
You can now write Urdu in almost any software (but not all) that lets you type and supports Unicode. (Unicode is a standard for representing and manipulating text from different writing systems of the world.)
Typing in Urdu can be a little awkward at first, but it can also become enjoyable with some practice. Some tips are below:
- On the download page for CRULP Urdu Phonetic Keyboard Layout, there is also a link that says “Release Notes”. It’s a PDF file with information on the keyboard layout, but more importantly, it contains the mappings of Urdu alphabets for the keys of your computer’s keyboard. Use it as a reference whenever you can’t find any Urdu alphabet on the keyboard.
- Use a better Unicode text editor for creating and editing your Urdu text files. I recommend using BabelPad. It lets you select keyboard layouts through its own interface, so you don’t need to go to the Language Bar, and it also has several tools for working with Unicode and Unicode fonts.
- If you want to create fully formatted documents in Urdu, you can do so by using Microsoft Word, or OpenOffice.org Writer, or any other word processor. Please refer to the respective help files of your word processor for specifying the right-to-left direction and other issues. (They are not much difficult, so you shouldn’t have any problem.)
Alternatives
If you don’t want to install the keyboard layout for some reason, there are other methods for typing in Urdu.
One of them is the Urdu OpenPad. It is written in Javascript and runs in your web browser, so there’s no need for installation or any other related jazz. If all you want is to write small snippets in Urdu and then copy & paste them to some other place, then OpenPad is perfect for the job.
Another alternative is Google Transliteration. This nifty tool lets you type in Roman Urdu, and automagically converts it into proper Urdu. For example, if you type “naam” (followed by a space), it will be converted into “نام”. Keep on typing and each word you type will be converted after you type space or other punctuation.
Writing Urdu on this blog
The only place in this blog where you would want to write Urdu is the comment box, and chances are that you have arrived here after following the link that promises more information about some mysterious tags.
First thing first, then. These tags (described below) do not magically enable your keyboard for typing Urdu. You need to have an Urdu keyboard layout installed in your operating system for that. If this is not the case, or if you don’t understand what I am talking about, then please go to the top of this page and start reading from there.
So you have an Urdu keyboard layout installed in your computer, or you have some other method of typing Urdu at your service, and you want to leave a comment on this blog in Urdu. So what do these tags do? They make sure that the Urdu you will type gets displayed in the correct markup and with appropriate styling, so that there is no problem in reading it.
Here we go then.
[p:ur][/p]
Use these when you are writing an Urdu paragraph. For example, if you type this:
[p:ur]یہ اردو کا ایک پیراگراف ہے، جس کا مقصد فی الحال کچھ بھی نہیں ہے۔[/p]
It will appear as:
یہ اردو کا ایک پیراگراف ہے، جس کا مقصد فی الحال کچھ بھی نہیں ہے۔
[w:ur][/w]
Use these tags when you want to write an Urdu word or phrase inside an English sentence. For example:
Cat is called [w:ur]بِلّی[/w] in Urdu.
This will appear as:
Cat is called بِلّی in Urdu.
If you wish to enter your name in Urdu in the comment form, you can use the same tags around it, and it will be styled properly.
[w:en][/w]
These tags are opposite of the previous. Use them when you want to write an English word or phrase inside an Urdu sentence. For example:
[p:ur]ہم نے بچپن میں ایک بِلّا پال رکھا تھا، جسے ہم [w:en]Tom[/w] کہتے تھے۔[/p]
This will appear as:
ہم نے بچپن میں ایک بِلّا پال رکھا تھا، جسے ہم Tom کہتے تھے۔
Note that the text with tags is slightly confusing to read, but that’s what happens when we are playing with raw bi-directional text.
Feel free to play around with these tags in the comment box below. Try to be creative, though!
The only downside of these tags that is known to me is that they also appear in the comments feed. This is because the plugin that I am using to replace these tags with XHTML markup does not perform a permanent substitution, and only replaces these tags when the comment is retrieved from the database and is about to be displayed. I hope I’ll hack the plugin soon to do a permanent replacement, but considering my reputation, it might not be soon enough.
That’s it, folks. Please leave a comment if I’ve been wrong somewhere, or if you have any queries.
61 comments
شاھد
Nov 30, 2008 at 9:00 pm
واہ کیا آسان طریقہ ھے۔ شکریہ
شاھد
Nov 30, 2008 at 9:04 pm
Agar asay koi smjhay to kis ko bhala samajh nahin aay ga . kia windows xp kay menu bhi ishi tarha badal saktay hain ?
Saadat
Dec 3, 2008 at 2:58 pm
Shahid,
I am afraid I don’t understand what you mean by changing menus of Windows XP. If you want to change the whole language interface of Windows XP to Urdu, then you can install the Urdu Language Pack that Microsoft provides. (You will need a genuine copy of Windows XP for downloading it.)
Fost
Dec 12, 2008 at 3:05 am
Nice blog btw
Sultan Muhammad
Dec 12, 2008 at 9:08 am
Boht boht sukriya ye tariqa boht acha. lykan ek masala hai main nay XP SP 2 installed ke hai our urdu language be install kar le hai lykan is main urdu phonotic keyboard layout nahee ata hai plz is ka koi tariqa be bata dain.
Aap ke boht boht meharbani ho ge
Sultan Muhammad
Dec 12, 2008 at 10:02 am
ڈئیر شاھد
میں نے اردو کیبورڈ بھی انسٹال کر لیا ہے
آپ کا بہحت شکریہ کا آپ نے اردو لکھائ کا طریقہ بتایا۔ اور اس واجہ سے میں آپ کو یہ میسج لکھ رہا ہوں
آللہ آپ کو بہحت ساری خوشیان دے۔ [آمین]۔
Saadat
Dec 12, 2008 at 8:20 pm
سلطان محمد،
مجھے خوشی ہے کہ میری یہ تحریر آپ کی مدد کر سکی۔ دعاؤں کا بہت شکریہ۔
(ویسے میرا نام سعادت ہے!)
Oneeb Ahmed
Jan 30, 2009 at 5:31 am
thanks a lot. its a great help. !!!!!!شکریہ
ثاقب نقو ی
Feb 24, 2009 at 2:33 pm
سلام
میرا اردو ان پیچ صیح طور پر کام نہیں کر رہا ہے۔ اسلیے میں نے ایم ایس آفس کے ورڈز پر کام کرنا شروع کیا۔ کچھ اسی طرح کے طریقہ سے میں نے میک کمپیوٹرز پر بھی کامیابی سےاردو کو چلا لیا ہے۔
اب مجھے کچھ تکنیکی مساءیل کا سامنا ہے۔ ہو سکتا ہے کہ اس فورم پر میرے مساءیل کا حل نکل اءے۔
پہلی چیز یہ ہے کہ اردو اور انگریزی دونوں زبانوں میں بیک وقت لکھنا ہو تو نتاءیچ غیر متوقع اتے ہیں۔ یعنی کہ الفاظ متوقع ترتیب کے مطابق نہیں اتے بلکہ انکی جکہیں تبدیل ہوجاتی ہیں۔
دوسرا مسءلہ یہ ہے کہ “ء “کا استعمال بھی صیح طور پر نہیں ہو پا رہا۔ جیسا کہ اس بلاگ میں بھی اپ حضرات دیکھ رہے ہوں گے۔
تیسرا مسءلہ ایم ایس ورڈز اور گرافک سوفٹ وءیر کے باہمی اشتراک کا ہے۔ یعنی کہ اردو فانٹس اڈاب فیملی میں سپورٹڈ نہیں ہہں۔ اور نہ ہی ان پیچ کی طرح فوٹو شاب میں کاپی پیسٹ کیے جا سکتے ہیں۔
اگر ان مساءیل کا حل ہو تو ضرور مطلع کریں۔ بالخصوص اردو انگریزی دونوں زبانوں میں مکس لکھنی کی کوءی بہتر تجویز مہیا کریں۔
شکریہ۔
Saadat
Feb 25, 2009 at 11:12 am
ثاقب نقوی،
ایم ایس آفس میں بیک وقت اردو اور انگریزی لکھتے ہوئے ایسی صورتحال کا سامنا مجھے تو کبھی نہیں ہوا۔ آپ اس صفحے پر Formatting text and paragraphs کے تحت تفصیلات پڑھ سکتے ہیں۔ (Right-to-Left بٹن کو سلیکٹ کر کے آپ لینگوئج بار کے ذریعے بآسانی اردو اور انگریزی کے درمیان بغیر کسی بے ترتیبی کے منتقلی کر سکتے ہیں۔)
“ء ” کا استعمال نہایت آسان ہے۔ اپنے کی بورڈ لے آؤٹ میں وہ کی تلاش کیجیے جو “ئ” لکھتی ہو۔ اب اگر آپ نے “مسئلہ” لکھنا ہو تو یوں لکھیے: م + س + ئ + ل + ہ۔ اسی طرح جہاں جہاں “ء ” حروف کے درمیان آئے، تو “ئ” کا استعمال کیجیے۔
اڈوب کے سافٹوئیرز میں Middle East editions کچھ حد تک اردو لکھنا سپورٹ کرتے ہیں۔
باقی یہ کہ یہ جگہ فورم نہیں، بلکہ بلاگ ہے۔ اردو کمپیوٹنگ کا ایک بہت اچھا فورم اردو محفل ہے۔ وہاں آپ کو آپ کے سوالات کا کافی جامع جواب مل جائے گا۔
ثاقب نقو ی
Feb 25, 2009 at 11:38 am
سلام
سعادت صاحب
تفصیلات مہیا کرنے کا بہت شکریہ۔
کل میں نے کچھ حل نکال لیا تھا۔ ایم ایس افس کے ورڈز میں ہمیں زبان کی سیٹنگز میں تبدیلی کرنا ہوتی ہے۔ یعنی کہ مکس لکھنے کے لیے ورڈز کی دیفالٹ زبان کو انگریزی کی بجاٗے اردو میں تبدیل کرنا ہوتا ہے۔ یہاں میں یہ ذکر کرنا ضروری سمجھتا ہوں کہ یہ بات میں ورڈز کے 2007 ورژن کے متعلق کر رہا ہوں۔
تاہم اپ کے تعاون کا شکریہ اور میں اردو محفل کا بھی دورہ بھی ضرور کروں گا۔
اگر کسی دوست کو میک کمپیوٹرز پر اردو لکھنے کے حوالے سے معلومات درکار ہوں تو مجھے اس ضمن میں معلومات مہیا کر کے خوشی ہوگی۔
ایکبار پھر اپ کے تعاون کا شکریہ
Salman, Khwaja
Mar 15, 2009 at 2:13 am
An awesome way to install the urdu fonts. I did installed the urud on my linux box. thanks for your guide.
Waise, did I tell you, your blog design is very usable and very simple?
Rahmat Aziz Chitrali
Nov 18, 2009 at 11:23 am
please let me know that how to download urdu phonetic keyboard
Saadat
Nov 18, 2009 at 11:29 am
Rahmat Aziz Chitrali,
You can download the phonetic keyboard layout from this page.
ولید
May 16, 2010 at 11:47 pm
اعلی مزا آ گیا۔ keep it up yaaaaaaaaaaaaaaaaaaaaaaaaaaaaaaaaaaaar
Captan Jahangir
Jun 5, 2010 at 9:17 am
کیا بات ہے آپ کی مدد سے ہم آج MS Office میں اُردُو لکھ سکتے ہیں۔ آ پ کابہت بہت شکریہ۔
Umar
Jun 25, 2010 at 11:13 am
I want to type urdu text in ms word. Please tell me the prcedure
Saadat
Jun 25, 2010 at 4:39 pm
Umar,
If you are using Windows XP, then follow the instructions given on this page for installing right-to-left language support and the Urdu Keyboard layout in your computer. Then open Microsoft Word, change the keyboard language to Urdu, and start typing.
Azmat khan
Sep 12, 2010 at 10:16 pm
محترم جناب
اگر آپ مجھے Adobe pagmaker میں اردو کے جمیل نستعلیق یا اس طرح کا کوئی نستعلیق فونت چلانے کی کوءی طرقیب بتائے تو مہربانی ہوگی
Saadat
Sep 13, 2010 at 9:27 am
عظمت خان،
معذرت کہ میں اس بارے میں علم نہیں رکھتا، لیکن آپ اردو محفل فورم پر جا کر اس سے متعلق پوچھ سکتے ہیں۔ ممکن ہے وہاں آپ کو آپ کے سوالات کا جواب مل جائے۔
نورین ایوب
Jan 10, 2011 at 10:43 pm
بہت بہت شکریھ اتنی انفرمیشن دینے کا رفتہ رفتہ لکہنا بہی سیکھ جا؛یں گے انشا؛ﷲ
yasoob mohammed shakir
Feb 27, 2011 at 7:19 pm
dear sir
pl help me to install urdu key board where I can adjust my alphabet with my choice. I want my key board like arabic key board but 100% 20% I want
keys to be justed by me like p gaff and some more my key board is arabic
so arabic english alphabet are written on key so it is easy to write. In my computor I am using arabic and english it is ok now only urdu fonts I dont know how to install. inpage 3 is not like inpage 2.4
I dont know why they remove such nice faicility that I can set my own key board in inpage 2.4 edit – preferences- keybard layout where I was able to set my phonetic key board. can you inform me any another urdu program where other than pakistani urdu fix key board system.
thanks a lot again
Saadat
Feb 28, 2011 at 9:20 am
yasoob mohammed shakir,
I am sorry I cannot help you with your problems related to InPage. However, if you want to make your own keyboard layout to install in your computer and use it in other applications, then this tutorial should help you.
مالا
Mar 9, 2011 at 10:12 pm
جیتے رھیے ۔۔ میں کب سےایسے میتتھڈ کی تلاش میں تھی
Saadat
Mar 10, 2011 at 11:01 am
مالا،
آپ کا تبصرہ پڑھ کر میرا دل باغ باغ ہو گیا ہے! خوش رہیے!
Raffaqat(jhelum)
Mar 11, 2011 at 9:43 pm
AOA,
yar main nain bahot koshash ki hai lekin mere system main urdu nahi aa rahi hai…jahan pr English US aata hai na…! wahan pr urdu hi nahi aa rahi..to ap se Request hai k mujhe batain k urdu kahan se aye gi….please tell me on this yahoo ID…[snip]…aap ki bari mehrbani ho gi
Saadat
Mar 12, 2011 at 12:50 pm
Raffaqat(jhelum),
Have you installed the Urdu keyboard layout? And if yes, have you added it in your computer’s lists of keyboard layouts as shown in Step 2?
Irshad
Apr 16, 2011 at 12:56 pm
I can’t write ^ on words in Urdu, as i can write in Inpage. Whenever, i try to write on different words, it breaks the word.
Saadat
Apr 18, 2011 at 9:23 am
Irshad,
I believe you’re talking about جزم, right? Depending on the font, you might get some trouble with it; which font are you using? In my experience, Nafees Web Naskh is pretty good at handling it. Alvi Lahori Nastaleeq and Jameel Noori Nastaleeq also do a reasonable job, but I haven’t used them extensively. Nafees Nastaleeq, however, frequently messes it up.
رضوان
Jun 24, 2011 at 12:47 am
سر بہت بہت شکريا
ali asad
Jul 6, 2011 at 7:58 pm
بہت شکریہ
Farhan Shahid
Jul 9, 2011 at 5:31 am
I want to know if its possible to load the Urdu OpenPad script from the server so that people can comment (in urdu) on the blog even if they donot have an ‘Urdu keyboard layout’ installed on their computers.
Just curious.
Saadat
Jul 9, 2011 at 8:39 am
Farhan Shahid,
Yes, it is possible. If you’re using WordPress, you can use WordPress Urdu Editor plugin. It lets visitors write Urdu in comment boxes, and also lets administrators and authors use Urdu in WordPress’ admin areas. (I do not use this plugin, so I am not sure if it works with the most recent versions of WordPress; therefore, please test it locally first.) A large number of Urdu blogs, though, do use this plugin.
Farhan Shahid
Jul 9, 2011 at 5:57 pm
And one more thing.
How do you accomplish the @font-face trick on your blog?
Saadat
Jul 9, 2011 at 8:58 pm
Farhan Shahid,
See this for @font-face: The Essential Guide to @font-face.
Farid Ansari
Oct 5, 2011 at 1:49 am
Mohtaram Saadat saheb,
assalam o alikum,
Isqadar asaan aur munasib tefseel (na kam, na ziyada) k saath is se pehlay keheen mujhay is ahem mau’zu per rahnumaii naheen mili. Abhee tu is tehreer ku sirf perha aur ksi had tak samjha hy; inshaAllah chand dinun mn is ko istemaal kerunga. Lekin, perh ke hee mehsus hu reha hy k pehlee na sehee, aglee ek-du koshihsun mn kamyab hu jaunga.
Behad mashkur. Allah aap ku jaza ata fermayen. ameen.
Ab ek chota sa problem: mera OS Win 7 64-bit Home Premium hy (machine is HP ProBook 4530s with second gen i3). Kiya aap ke dee hui hidayat ka itlaaq is OS per bhee hu ga?
Nez yeh bhee bataen k Nastaliq (ya multay jultay) fonts k liye kiya kerna huga, aur, kiya is terha installation krnay k baad mn FB mn bhee Urdu mn type ker sekunga?
Tawalat k liye muazzirat!
Farid
Saadat
Oct 5, 2011 at 9:39 am
فرید انصاری صاحب،
وعلیکم السلام۔ صفحے کی پسندیدگی اور دعا کا بہت شکریہ۔
وِنڈوز 7 پر اردو کِیبورڈ انسٹال کرنے کے لیے اوپر دی گئی لمبی چوڑی ہدایات کی ضرورت نہیں۔ آپ بس یہاں جا کر اردو کِیبورڈ لے آؤٹ اتار لیجیے، اور پھر اسے اپنے کمپیوٹر میں انسٹال کر لیجیے۔ انسٹالیشن مکمل ہونے کے بعد ٹاسک بار میں داہنی جانب لینگوئج بار کا EN والا آئکون نمایاں ہو جائے گا۔ اس پر کِلک کر کے UR منتخب کیجیے اور پھر اردو ٹائپ کیجیے۔
نستعلیق فونٹس آپ کو ان روابط پر مل جائیں گے:
نفیس نستعلیق
علوی لاہوری نستعلیق
جمیل نوری نستعلیق
ان فونٹس کو ڈاؤنلوڈ کرنے کے بعد انہیں ڈبل کِلک کر کے کھولیے، اور پھر ”انسٹال“ نامی بٹن پر کِلک کر دیجیے، فونٹس آپ کے کمپیوٹر میں انسٹال ہو جائیں گے۔
کِیبورڈ انسٹال کرنے کے بعد آپ فیس بک پر بھی اردو لکھ سکیں گے، لیکن وہاں فونٹس تبدیل کرنے پر آپ کا اختیار نہ ہوگا۔
فرید انصاری
Oct 7, 2011 at 2:02 am
سعادت صاحب
اسلامُ علیکم
یقین نہیں آیا کہ شب ۱:۳۰پہ آپ کے بلاگ پہ لکہے ہوے پیغام کا جواب صبح ۱۱ بجے موجود تھا-
حیرت کی وجہ خود آپ کی اپنی راِئے اپنی “ایفیشنسی” کےبارے میں-
آپکی راہنمائی کسقدر کارگر رہی اسکا ثبوت -اور میرا شکریہ-اس راہنمائی کے ذریعہ پانچ منٹ میں کیبورڈ لےآئوٹ اور فانٹس کا حصول’ انسٹالیشن اور اس کاوش کےذریعہ اردو میں تحریرشدہ یہ جواب ھے-ابھی کچھ باتوں پر عبورتو دور کی بات ھے’ شاید مجھے بہت سی خصوصیات مثلا”فارمیتٹنگ وغیرہ کا علم ہی نہیں-
اس پیراگراف میں نستعلیق فانٹ کے استعمال کی خواہش تھی لیکن شاید اس بلاگ میں یہ آپشن نہیں یا مجھے اس پر عبور نہیں-
بہرکیف’اردو میں کمپیوٹر پہ تحریر کرنا تو ممکن ہوا’ باقی بھی آ ہی جائے گا-
جزاک اللہ
خیر اندیش
فرید انصارِی
Saadat
Oct 7, 2011 at 3:37 pm
فرید انصاری صاحب،
مجھے خوشی ہے کہ میں آپ کے کام آ سکا، اور قوی امید ہے کہ آپ جلد ہی باقی تفصیلات بھی سیکھ جائیں گے۔
اس بلاگ میں اردو تبصرہ کرتے ہوئے نستعلیق فونٹ کا استعمال ممکن تو ہے، لیکن معذرت کہ یہ طریقہ کچھ اتنا سہل نہیں۔ اسی لیے اکثر میں خود ہی دوسروں کے اردو تبصروں کو نستعلیق میں ڈھالتا ہوں۔
پرھ
Oct 15, 2011 at 11:55 pm
آپ کا نلاگ بھت مددگار ثابت ھءا اور یۃ ایک لائےن لکھنے میں مجھے آدھا گھنٹا گ گیا
farid ansari
Nov 16, 2011 at 1:13 pm
Sa’adat saheb,
assalam o alikum
Umeed aur dua hy k aap bkhairyat v khush-o-khurram hungay, ameen.
Ek mas’ala pesh aa gaya hy: chand mah se badee kamyabi k saath urdu ka istemal hu reha tha word processing, chat, email vghaira mn. Kal shab desktop p kuch gar-bar hui jisku rectify/undo krtay task bar p ju language change krnay ka icon bana tha Urdu install krtay huay, ghaib hu gaya. Bavajud koshish k mein isay vapas nai la saka. Is icon ka qareeb ju up-ward pointing triangle bana huta hy jiskay zareeay bahut saray commands mil jatay hyn usmay bhee nai aa reha. word processor use krtay huay bhee language tebdeel krnay ka option nai mil reha. Han, pichlee installation mn ju urdu fonts install huay thay vo maujud hyn.
Kya kuch madad frmayengay?
Kuch zaruree tefseel: mera OS Win 7 64-bit Home Premium hy (machine is HP ProBook 4530s with second gen i3)
Madad ka muntazir,
Farid Ansari
Saadat
Nov 16, 2011 at 6:10 pm
Farid Ansari sahab,
It looks like that the garr-barr on your computer’s desktop hid the Language Bar. Follow these steps:
1. Go to Control Panel.
2. Under “Clock, Language, and Region”, click “Change keyboards or other input methods”.
3. A dialog box will appear. Click the button that says “Change keyboards…”.
4. Another dialog box will appear. In it, you should see the “EN” and “UR” icons inside a box (which actually indicates that English and Urdu keyboards are available in your computer).
5. Select the “Language Bar” tab.
6. Select the radio button that says “Docked in the taskbar”.
7. Click the “Apply” button.
8. Click the “OK” button.
Hopefully, after carrying out these steps, the Language Bar should appear right where it earlier was.
On the other hand: if, in step 4, you don’t see any mention of an Urdu keyboard, then re-install the Urdu keyboard layout.
farid ansari
Nov 16, 2011 at 7:21 pm
JazakAllah.

x (infinity) . . . for such prompt response.
Had done part of that;
now, will follow the remaining steps as suggested by you.
Guru, you rock!
farid ansari
Nov 16, 2011 at 9:09 pm
And, it worked! Just as I expected your instruction would!

My, you are getting to be too predictable!
Pun intended.
10/10, Sa’adat sb, for brevity AND precision combined.
Now, some thing that does NOT require your immediate attention (so that other Dummies like me can benefit from your attention and help; then we just might start a fan club):
i) Can I get a printable/displayable layout showing keyalphabet? InPage used to have this feature; when invoked, you got a dock-able/floating layout.
ii) How do I use the Unicode character codes for directly inserting a character from the font set into a text string? Eg., a ligature, etc.
‘Hope life is going great for you.
Best regards.
Farid
Saadat
Nov 20, 2011 at 10:24 am
Farid Ansari sahab,
I am glad it worked.
As for your other queries…
i. For a printable keyboard layout, go to the keyboard layout’s page, and download the “Release Notes”. For a displayable layout on your computer’s screen, go to Start > All Programs > Accessories > Ease of Access, and click On-Screen Keyboard. This will display a virtual keyboard, and when you select UR from the Language Bar, it will show Urdu characters. (You can also use mouse to input characters from this keyboard.)
ii. I am not really sure I understand your question. If the ligatures you are interested in are defined in the Unicode standard and if they are supported in the font you are using, then you can use a Unicode text editor (such as the excellent BabelPad) for finding that ligature and inserting/copying it. Otherwise, I have no clue.
فرید انصاری
Nov 22, 2011 at 12:18 pm
راہنمائی کے لئیےبہت مشکور
سوال نمبر ۲ کی طرف بعد میں آتا ہوں۔ اس سے پہلے آپ کی توجہ
www.urduweb.com
کی طرف مبزول کرانا چاہونگا۔ غالبا” آپ اس سے پہلے ہی متعارف ہونگے [کمپیوٹر پہ اردو کے استعمال میں اپنی دلچسپی اور تکنیکی اہلیت کی وجہ سے] اگر آپ اس ویب پیج تک پہلے نہیں گئے تو ضرور دورہ کیجئیے۔
میری ناچیز رائے میں دونون ویب سائٹس اور زبانِ اردو کو فایئدہ ہوگا۔
والسام و خیراندیش
فرید
Saadat
Nov 22, 2011 at 4:40 pm
فرید صاحب،
آپ شاید http://urduweb.org کی بات کر رہے ہیں۔ میں اس ویب سائٹ سے واقف ہوں، اور وہاں کے فورم، اردو محفل، کا رکن بھی ہوں۔
فرید انصاری
Nov 25, 2011 at 2:03 am
درست کہا آپ نے
صحیح urduweb.org ہے
اور منسشاء میرا بھی اسی فورم یعنی “اردو محفل” کا تھا
:-]
Ashiq
Jan 3, 2012 at 9:33 am
Dear Sir,
kindly let me know any paragraph/ sentence containing all alphabets of Urdu
which my help my kid to practice urdu writing
Thanks
Saadat
Jan 3, 2012 at 10:06 am
Ashiq,
For practising Urdu handwriting, there are many good books available in the market. I would suggest you use them instead of a single paragraph or sentence.
ismail raza
Jan 10, 2012 at 8:22 am
Good and excellent work for our great Urdu , i want some help , which is the best translator from Urdu to English and how i shall install it.
Saadat
Jan 10, 2012 at 9:35 am
Ismail Raza,
The only Urdu to English translator I have used is Google’s. It’s rather clumsy (as almost all machine translation tools tend to be), but it can be useful. You don’t need to install it; it works in the web browser.
نور
Jan 10, 2012 at 1:57 pm
بہت اچھی معلومات دی گئی ہیں اس بلاگ پر.
اللہ کرے زور قلم اور زیادہ
عامر سجاد گیلانی
Feb 18, 2012 at 2:26 pm
بہت مفید بلاگ ہے۔ زبردست۔ شکر ہے کہ پاکستانی سافٹ وییر والے کچھ کام مفت میں کر رہے ہیں۔
فرحان عزیز
Mar 22, 2012 at 2:20 pm
بہت بہت شکریہ آپ نے اتنی اچھی معلومات پونھچائیں دل خوش ہو گیا.
shahid
Mar 22, 2012 at 8:47 pm
i am very thankful to you for this great job and thanks for sharing.
محمد فاروق
May 11, 2012 at 3:23 pm
محترم
برائے مہربانی مجھے لفظ گاوں میں و پر ء ڈالنے کے لیے طریقہ بتا دیں
یا اگر اس کی سنگل کی ہے تو وہ بتا دیں
جزاک اللہ خیر
محمد فاروق
May 11, 2012 at 3:39 pm
محترم بھائی
مجھے ایکسپلورر میں کمنٹس جمیل نوری تستعلیق میں لکھنا بھی سکھا دیں۔ میں فونٹ کیسے تبدیل کر سکتا ہوں۔ کیا مجھےکمنٹس ورڈ میں لکھ کر فارمیٹ کرنا ہوں گے اور کاپی پیسٹ کرنا ہوں گے۔
جزاک اللہ خیر
Saadat
May 11, 2012 at 4:11 pm
محمد فاروق،
بد قسمتی سے CRULP کے فونیٹک کِی بورڈ لے آؤٹ میں “ؤ” کے لیے کوئی کنجی نہیں ہے۔ اگر آپ “ؤ” لکھنا چاہتے ہیں تو اس کے دو طریقے ہیں: یا تو آپ کوئی دوسرا کِی بورڈ لے آؤٹ استعمال کریں، یا پھر کسی کیریکٹر میپ ایپلیکیشن میں سے “ؤ” کو کاپی کر کے مطلوبہ جگہ پر پیسٹ کر لیں۔ میں ذاتی طور پر اردو لکھنے کے لیے BabelPad کا استعمال کرتا ہوں، اور جب بھی “ؤ” یا کسی ایسے کیریکٹر کی ضرورت پڑتی ہے جو کی بورڈ لے آؤٹ میں موجود نہ ہو، تو Tools مِینو میں جا کر کیریکٹر میپ کھولتا ہوں اور اس میں سے مطلوبہ کیریکٹر تلاش کر کے اپنے متن میں شامل کر لیتا ہوں۔
رہا کمنٹس کو جمیل نوری نستعلیق میں لکھنے کا معاملہ، تو آپ کمنٹس کہاں لکھنا چاہ رہے ہیں؟ ننانوے اعشاریہ نو فیصد امکانات تو یہی ہیں کہ آپ کسی دوسری ویب سائٹ پر تبصرے لکھتے ہوئے اپنی مرضی کا فونٹ منتخب نہیں کر سکیں گے، اور آپکے تبصروں پر جو فونٹ اپلائی ہو گا، وہ وہی ہو گا جو بلاگ کے مالک نے اپنے ڈیزائن میں سیٹ کر رکھا ہے۔
عتیق
Aug 31, 2012 at 11:14 pm
Slaam saadat bhae !
main ms word main nori nastaleq font main urdu likhna chahta hon kindly bta dain ye kesay ho ga ?
Saadat
Sep 1, 2012 at 11:07 am
Atiq,
1. Install the Urdu keyboard layout in you computer, as described above in this page.
2. Install Alvi Lahori Nastaleeq or Jameel Noori Nastaleeq font.
3. In Microsoft Word, choose the Alvi/Jameel font, select “UR” from the Language Bar, and then start typing.